
Lesson Plan Module

PRISM’s Lesson Plan module was created to aid teachers from around the state in implementing digital resources in their classroom pedagogy. It also has developed an area in which these implementations can be stored and easily shared amongst other PRISM users. The Lesson Plan module contains two distinct sections of use, the search area (above) and the creation area (below).

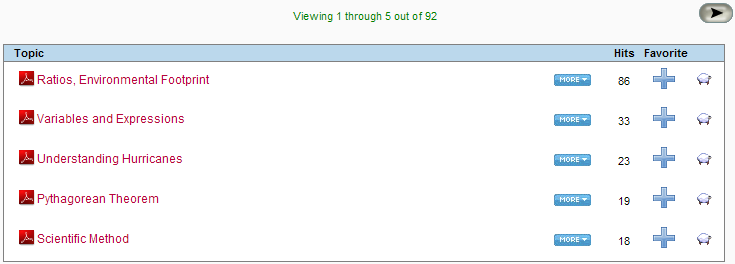
Searching for lesson plans is done through a simple layout that allows teachers to narrow their search based on the title or topic or the lesson and also by the standard or author of the lesson. Searching allows a teacher to utilize lessons that meet the standards they need to teach and use lessons created by their favorite authors. Each search result has some options to play with. If you click on the title of a lesson plan you will be prompted to download a neatly formated .PDF of that lesson plan. Some lesson plans will require additional files to perform. These lessons will have an ![]() icon beside them. Clicking this icon will prompt you to download a .ZIP file containing all the files attached to the lesson plan.
icon beside them. Clicking this icon will prompt you to download a .ZIP file containing all the files attached to the lesson plan.

Much like the PRISM Materials search, you can find out additional information on a lesson plan by clicking the "MORE" button. This will expand a section below the lesson plan that delivers important information about the lesson plan.
You may also toggle the ![]() or
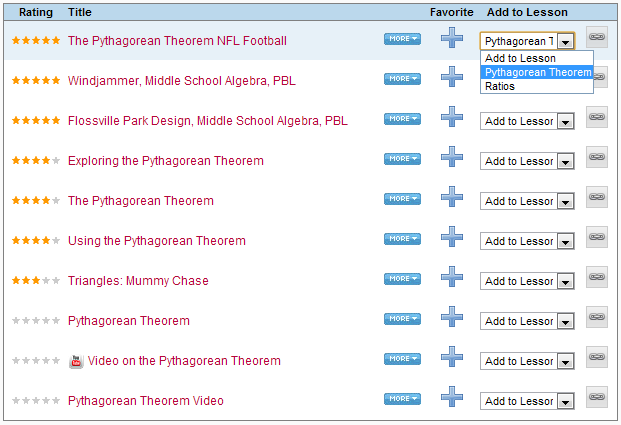
or ![]() buttons to add the PRISM Lesson Plan to your personal PRISM Favorites list. These favorites can be managed from the PRISM Profile area. Adding a lesson plan to your Favorites list will also allow you to integrate that lesson into a Moodle course.
buttons to add the PRISM Lesson Plan to your personal PRISM Favorites list. These favorites can be managed from the PRISM Profile area. Adding a lesson plan to your Favorites list will also allow you to integrate that lesson into a Moodle course.
Standards Restrictive Search: See Materials Standards Restrictive Search
Create New / Manage PRISM Lesson Plans
Teachers can create their own lesson plans by looking below the search and finding the Create New / Manage Existing Lesson Plan area. By clicking "Create New" you will be taken to a screen that lets you begin creating a brand new lesson plan. The first step of creating a lesson plan is to fill out some of the guidelines and objectives of the lesson plan. These can be edited at any time by going to the Manage area.
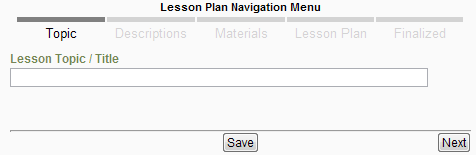
Topic:
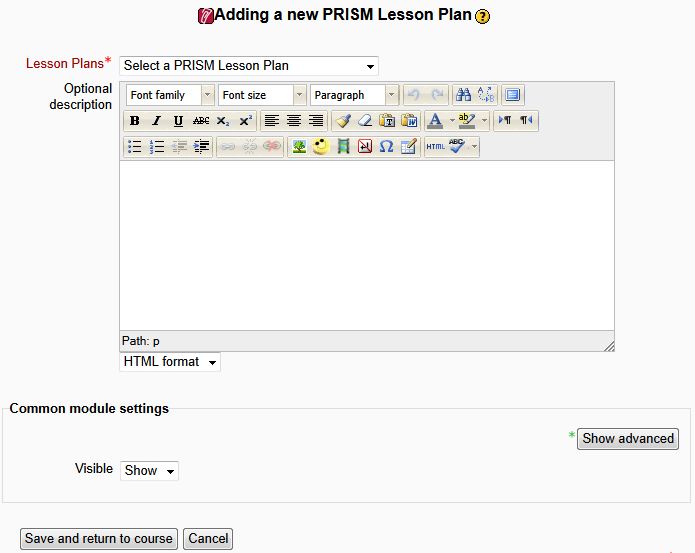
The PRISM Lesson Plan consists of 4 parts. When you create a new lesson plan, the first step is naming your lesson plan. This should be descriptive enough to be found in a search. Use keywords that might help index your lesson to its topic. After you write a title, click the "Save" button or click the "Next" button to save and move to the next step.
Descriptions:
After you have saved you will be able to move back and forth between all the steps. The next step is a set of lesson descriptions. We understand that during the development of a lesson plan, some of these things might not be thought out at this point. At any time during the lesson plan development a teacher is able to edit these. If you are not ready to fill them out completely you can navigate to another step using the top navigation menu (will not save), or use the buttons at the bottom to save.
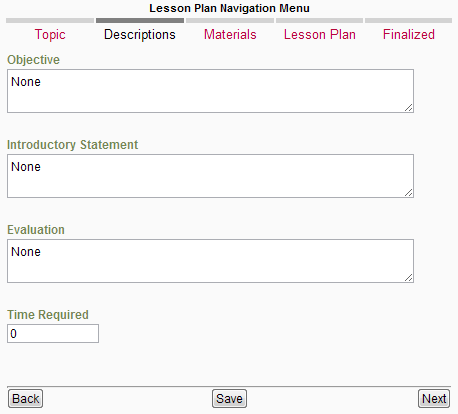
Objective - A short statement describing what you want your lesson plan to accomplish. As every teacher's style differs, this can include broad statements ("to excite the students about the upcoming studies of our solar system") or very narrow directives ("students will learn the names and order of the planetary objects in our solar system").
Introductory Statement - This was intended as a way for some teachers to include their own unique way of introducing a topic. We have found that some teachers have a really well thought out way of getting their students excited about learning. Short stories, funny jokes, and all other comments that could help a teacher begin their lesson would be appropriate here.
Evaluation - A description of how the lesson can or will be evaluated for effectiveness. This could be many different things. PRISM prefers Lesson Plans that feature digital resources, so many of our lesson plans also include a digital resource that can evaluate the topics, whether by a short quiz or fun games with scores for correct answers.
Time Required - This is an optional field that will give the amount (in minutes) of time required to complete the lesson in a classroom setting.
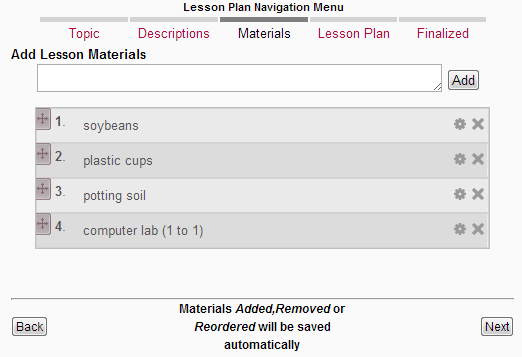
Materials:
The 3rd step is a materials list for your lesson plan. This can be 1 thing or many things. Just type into the text box at the top and click "Add". You can edit these by clicking the ![]() button, resort them by drag and drop using the move handle on the left side, and delete them using the
button, resort them by drag and drop using the move handle on the left side, and delete them using the ![]() button on the right side. This page will save your changes automatically.
button on the right side. This page will save your changes automatically.
Manage Lesson Plans:
From this screen you are able to edit or delete a lesson. Clicking the ![]() button will take you directly to the main lesson plan area and clicking the
button will take you directly to the main lesson plan area and clicking the ![]() button will delete the lesson plan.
button will delete the lesson plan.
Main Lesson Plan editor
![]()
Once you enter the main lesson plan editor area, you can freely go back and change the other 3 areas at any time by clicking the links "Topic", "Descriptions", and "Materials" at the top menu. You can also click the "Main Menu" button to go back to the lesson plan search page.
Creation via cloning:
While searching for lessons you may see a ![]() icon on the right side of the search. The clone tool allows a user to find a lesson plan that they want to build off of, or modify to meet their needs. Clicking the
icon on the right side of the search. The clone tool allows a user to find a lesson plan that they want to build off of, or modify to meet their needs. Clicking the ![]() button will create a duplicate of that lesson plan that you can edit. It will immediately take you to the edit screen where you can change the lesson plan to fit your needs.
button will create a duplicate of that lesson plan that you can edit. It will immediately take you to the edit screen where you can change the lesson plan to fit your needs.
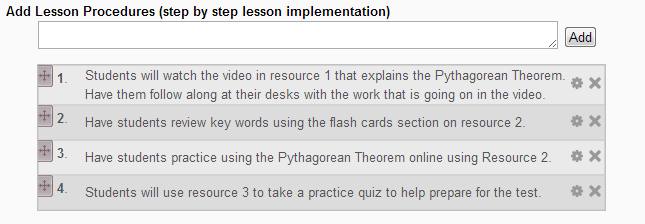
The first section of lesson plan building is the procedures section. Teachers can list all the steps and any other information necessary to execute the lesson. It also gives them the ability to reorder and edit their lesson’s steps. To edit click the ![]() icon. To reorder, click and drag the handle on the left side of the procedure. To remove a procedure, click the
icon. To reorder, click and drag the handle on the left side of the procedure. To remove a procedure, click the ![]() icon. To add a new procedure, type in the top box and click the "Add" button.
icon. To add a new procedure, type in the top box and click the "Add" button.
The second part of the lesson builder is the digital resource area. This includes 2 separate locations, the Teacher section and the Student section. There are 3 possible ways to include digital resources in a lesson plan.
1. Through the PRISM digital resource search.
2. By linking your own web resource.
3. Upload and attach a file resource.
1. PRISM's resource search is used to link resources to the user's lesson plan.

Resources Area
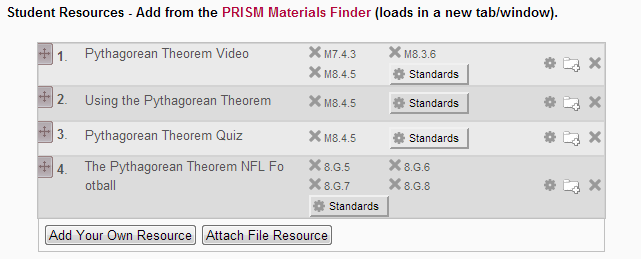
After the resource is added you can select which standard will be focused on when teaching this lesson plan. This is needed because a resource might help teach many different standards, however each lesson plan is focused on teacher only a few standards. Delete the standards that do not apply to your lesson plan by clicking the


This form allows you to choose the standards you are teaching. You can add as many as you wish, and when you are done, click the "Save New Resource" to add your resource to the sortable list of resources in your lesson plan. Selecting a standard that has already been added will change the
3. Upload a file (In both the teacher and student sections)
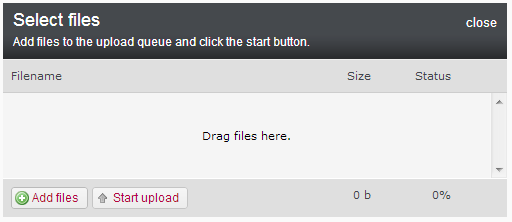
You may also attach files to your lesson plan. These could be file you want your students to have access to, or possible an answer sheet that you want to be only accessible by you, the teacher. First click the "Attach a File Resource" button in the desired section. Click the "Add files" button to select the file or files that reside on your computer or you can drag and drop the files into the area labeled "Drag files here". Then click the "Start upload" button to upload the files to the PRISM server. If you would like to rename the file before you upload you can simply click the name of the file and rename it. You must hit the "Enter" key to save the name change. You can also remove any files you accidentally selected by clicking the minus icon to the right of the file. If you want to close the form without uploading a file, click the "close" link.
Editing Resources
Folders
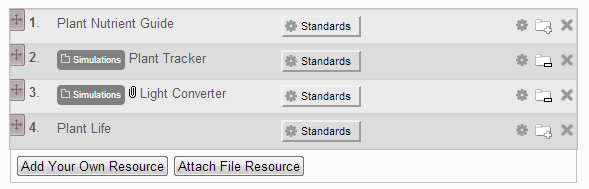
Another feature that can help keep your lesson plan organized is Folders. If you click the ![]() icon beside a resource, you will see a form that will allow you to do two things.
icon beside a resource, you will see a form that will allow you to do two things.

If no folder yet exists, only the "New Folder" button will show up.
There are two ways to add and remove resources from folders.
1. Using the ![]() and
and ![]() buttons to add and remove resources from folders. If you use the
buttons to add and remove resources from folders. If you use the ![]() button to remove a resource from its folder, the resource will automaticaly be moved below the last remaining resource of that folder. If it is the only resource in that folder it will not change positions. Likewise, adding a resource to an existing folder will move that resource to the last position in the folder group. In the above example, if we added the "Plant Growth Tracker" resource to the "Simulations" Folder, it would move into the 3rd position with all the other resources moving up and the "Plant Nutrient Guide" resource remaining in the last position.
button to remove a resource from its folder, the resource will automaticaly be moved below the last remaining resource of that folder. If it is the only resource in that folder it will not change positions. Likewise, adding a resource to an existing folder will move that resource to the last position in the folder group. In the above example, if we added the "Plant Growth Tracker" resource to the "Simulations" Folder, it would move into the 3rd position with all the other resources moving up and the "Plant Nutrient Guide" resource remaining in the last position.
2. Drag and drop sorting. If two or more resources are inside a folder, you can drag another resource inbetween those resources and it will automatically be added to that folder. Likewise, if you drag a resource that is inside a folder between two resources that are not in the same folder, it will be removed from the folder. If you drag a resource that is inside one folder to a position between two resources of another folder, the resource will change folders.
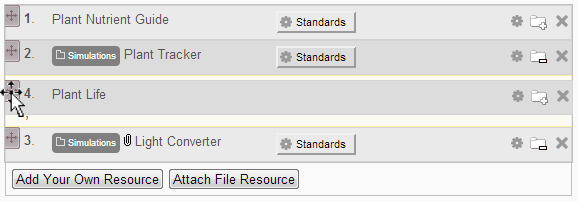
This resource is about to be dropped inside the "Simulations" folder.
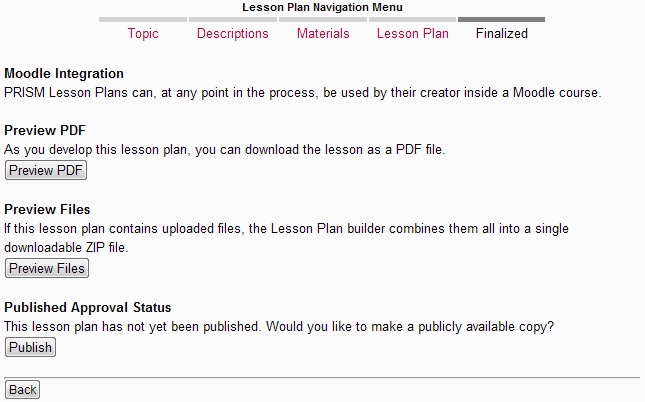
This screen gives the user the options of downloading the dynamically created PDF of their lesson or (if there are files attached), download the ZIP file containing all of their attached files.
Published Approval Status
Before another user can use your lesson inside a Moodle course, you must first have your lesson plan approved. This consists of two parts. First you must send your lesson for approval to be published. It must be approved before it is introduced into the Lesson Plan search for the public. To send your lesson plan for approval, you must go to the Finalize area of your lesson plan. At the bottom of the screen you will see a "Publish" button.1 Upon clicking the button an email will be sent to the PRISM staff for review. We will review all the lesson material that is sent and then decide whether or not to approve your lesson. Either way, once the decision is made you will receive an email notifying you of your lesson's status. You may edit and improve your lesson and resend for approval or update your approved lesson at any time.
1If your lesson plan has already been approved you will see a button that says "Update".
PRISM Lesson Plan Moodle Integration
Once your lesson has been created or you have selected a lesson plan as a favorite lesson plan, it will show up in a PRISM Moodle course assignment.
To see how this works, simply go to your Moodle course on PRISM. Make sure that editing is turned ON. The button in the upper right corner should appear like the one below.
Now that editing is turned on, go to the section of your course you would like your lesson plan to be shown in. Go to the Add a resource link and select PRISM Lesson Plan from the popup.
You will then be shown a screen that allows you to select from your favorite lesson plans and also your created lesson plans. These are the exact same plans that will also show up in your PRISM Favorites in your user profile and your Manage Lesson plans area. Optionally you can add a description to your lesson plan. Also make sure that the lesson plan says Visible "Show". Select the lesson you wish to add and click "Save and return to course".

The image above shows an example of what your lesson plan will look like inside your course. The digital resources of the Lesson Plan are listed as links directly to the resource on the web. The above example is both the teacher and student sections. A student will only see the bottom section. It should function much like label except that students will only see one part and the teacher can see both parts.